Parsva Urdhva Namaskarasana

This pose will elongate the concave side of the ribs and waist and shift a forward hip back toward the midline. Benefits to this pose includes stretching the spine, armpits, shoulders, quadratus lumborum (the QL is the most under stretched muscle in the body and responsible for side tipping) and belly.
Tipping to the concave side is taught differently than to the convexity. When stretching the concave side, really stretch out of that side while plugging the shoulder blade of the convex side in. Watch for rib flare. The left bottom rib will want to roll in. Roll the back of the right ribs forward.
When tipping to the convex side – reach diagonally (don’t tip over to the side) – to where the wall meets the ceiling. Bend the elbow of the convex side to plug the convexity into the back body. While reaching the concave side hand to where the wall meets the ceiling, note to keeping the ribs parallel.
While this posture tips, keep the spine of the neck long – do your best not to let an ear rest on the upper arm you are tipping to. However, if you have a cervical curve (very common) the head is going to want to tip into the cervical curve pattern.
This pic doesn’t show it but I would also recommend putting a vertical yoga block in the inner/upper thigh. This will do two things – keep the pelvis even AND strengthen the legs. Leg muscles are weak, a hip swing is prevalent in scoliosis. I recommend getting the best benefit of strengthening the legs in standing postures, like this by simply using a yoga block – inner/upper thigh. Note: I prefer a yoga block with a vertical line on it – so the student can see if the block is truly vertical or is it tipped? If the block is tipped, so is the pelvis…..
Note: I caution all readers to remain within their limits and adhere to the advice of their doctors. Never go into any posture for more than seven ujjayi breaths (maybe less) as a characteristic of scoliosis is spasming. Up to seven ujjayi breaths is best and highly recommended.
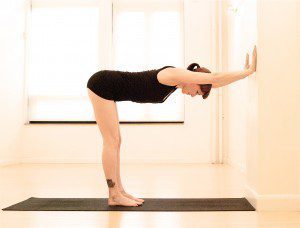
Ardha Uttanasana @ the wall

This version of Ardha Uttanasana stretches and lengthens your hamstrings, calves and front and back body including the full erector spinae and is a great choice for all four curve patterns.
By using traction at the wall like this, it is a back and spine strengthener which in turn improves posture. It improves digestion stimulating abdominal organs and belly. Indigestion and GERD is a common characteristic of scoliosis because the spine isn’t long – the concavity will drop organs together instead of letting them sit in their proper place within the . Lengthen, derotate for up to seven ujjayi breaths (maybe less but never more) and then do your strengthening posture to make this stick. The lengthening and derotating will last maybe 48 hours. By adding strengthening to the muscle group you just lengthened, you will get far great results that will last longer.
Many of my clients are fearful to go into One Rope Adho Mukha Shivasan (copy and paste this url from my Linda Benton YouTube channel for this posture demonstrated https://youtube.com/shorts/o_5CqA3nNeQ?feature=share) – this is a great beginning posture that doesn’t cause anxiety AND a great traveling pose.
This is also a great pose for kyphosis as the curvature from the kyphosis (in the thoracic spine) moves down vs it’s curving out. Cues – widen the width of the arms, spin both flat palms out and keep the spine of the neck long (lift the back of the head) vs allowing the chin to nod in (promoting kyphosis). This will assist in moving the upper and mid thoracic spine into the back.
For a spine with lordosis, the caution would be to allow a further anterior tilt of the pelvis – the pelvis is already forward (also shortening the psoas and weakening of the psoas and hamstrings). Before you move into this posture, I recommend putting a yoga block between the inner/upper thighs (also noted below in the correction of a left lumbar curve pattern), keeping relaxed – shoulders, breath and jaw – zipper the pubic bone up to just below the navel, pull the navel into the back spine and then pull the navel up into the diaphragm (I call this putting on a pair of tight jeans as back in the day when I was a teenager, tight jeans was quite the rage. I had to lay down on my bed to zipper up my jeans – much to the demise of my Irish Catholic mother) and then move into Ardha Uttanasan.
This pose adjusts depending upon your curve pattern which means:
Let’s first talk about convexity – the curve – what does this mean? The curve goes out to the side and then rotates back towards the back body.
The concavity – the side that hallows in – will roll in and down. Here’s what I’d like you to do. Stand in front of a mirror and if your a woman, have a sports bra on (men can be shirtless). Roll your pants to just below your belly button on your hips. Observe – where do you hallow out? I’m going to refer to that as the apex of the concavity – meaning – where do you cave in the most? Now read below to correct your curve pattern.
Note: if you have an opposite curve pattern to what is noted below, you’ll correct in the opposite cueing.
A right thoracic curve pattern would turn the right hand out, draw the shoulder blade onto the back body which in turn pulls the curve into the spine. Lengthen out of the left thoracic spine concavity (lengthen out of the concavity) AND now let’s address that left bottom rib. The left bottom rib is going to want to roll in – draw it up into the body.
A left lumbar curve pattern would put a washcloth under the right foot, lengthen out of the right pelvis AND with a focus of keeping both pelvis’ parallel. This pic also doesn’t show it but I would also recommend putting a vertical yoga block in the inner/upper thigh. Again, this will do two things – keep the pelvis even AND strengthen the legs. Leg muscles are weak, a hip swing is prevalent in scoliosis. I recommend getting the best benefit of strengthening the legs in standing postures, like this by simply using a yoga block – inner/upper thigh. Note: I prefer a yoga block with a vertical line on it – so the student can see if the block is truly vertical or is it tipped? If the block is tipped, so is the pelvis…..
A right thoraco lumbar curve pattern would follow most of the same cueing as a right thoracic curve pattern mentioned above in turning the right hand out, drawing the right shoulder blade onto the back body which in turn pulls the curve into the spine. The lengthening will be from the apex of the concavity – lengthen this. From the apex of this concavity, what is rolling in – draw what is rolling in up into the body.
A right thoracic/left lumbar curve pattern will, combine cues from right thoracic and left lumbar curves.
Note: I caution all readers to remain within their limits and adhere to the advice of their doctors. Never go into any posture for more than seven ujjayi breaths (maybe less) as a characteristic of scoliosis is spasming. Up to seven ujjayi breaths is best and highly recommended.